A Step-by-Step Tutorial
This section familiarizes you with creating a particle effect from scratch with a step-by-step procedure. If you’re already familiar with the process and need more specific information, skip this section. Creating your own bitmaps and plugging them into the particle editor is described later in this document. This procedure uses the example bitmaps provided with the editor, and the resulting effect is available as one of the example files (well, almost...). But now, let’s get into the tutorial.
Creating a Fire Effect
Start ParticleFX and create a new effect by clicking the New button. A new document window appears.It’s handy to have something in the background of the preview scene to see how large the effect is. Click the <none> button next to “KF Scene”, and browse into the Examples \ Backgrounds directory. Select grid.txt and press OK. This puts a translucent grid with 1 meter squares into the preview scene.
Now you need to create a Particle. Select “Particle” from the selector under the “Element and Emitter properties” then click the New button in the lower left corner of the window. This creates a new Particle and opens the properties window for it.
The particle is named “Unnamed Particle” as default. Change the name into something appropriate, like “Flames”.
First off, your particle needs a bitmap. Click the Import button under “Particle Bitmaps”. A file browser opens. Go to the “Bitmaps” directory under the directory where you’ve installed ParticleFX, and open the bitmaps.txt file.
The bitmaps.txt file has several particle bitmaps plugged in. A selector appears. Select the reelflames_additive one (the second lowest in the list) and click OK. The “Reel Flames” are a set of flame bitmaps captured from real flame footage. There are 6 sequences in total, each consisting of a different number of bitmaps. (If there are several “containers” in one particle bitmap set, ParticleFX automatically randomizes between the bitmap sets. This gives the particles variety. A particle effect can appear artificial if all the particles look identical.)
OK, the particle now has a bitmap, so it can be previewed. Skip this step and move to the next step if you can hold your curiosity for a little while. However, if you can’t wait to see what the effect looks like at this point, select Emitter from the Element and Emitter properties then click the New button to create a new Particle Emitter. After that, go to Emission Control, and click New to create a new emission, select “Flames” and the emitter you just created (“Unnamed Particle Emitter”) from the pop-up window and press OK. Press F2 to view the effect. You see a fountain of flame-like glowing, repetitively looping blobs spewing out of the emitter. Doesn’t look like flames? Of course not. There’s still a lot of tweaking to do. Close the preview by pressing F4.

This is what the results should look like with a flame bitmap and
default parameters applied
First off, you need to change some of the particle’s properties. Go back to the Particles section of the Element and Emitter properties, and double-click on the Flames particle to open it up. Here’s what you need to do:Change the Animation type to Lifetime. The flame bitmaps consist of sequences where a few different flames die away, so they should not loop.
Try previewing the effect now, and see what happens. A tower of flames flying upwards. Looks better, but still not quite there! Let’s do some further tweaking with the particle before moving to the emitter. Click the Size Graph button, and edit the graph to look something like this:
Ignore the animation FPS and random 1st frame properties, as they only apply to looping bitmap sequences.
Set the Particle Random Rotation from –180 degrees to 180 degrees. This randomizes the particles’ on-screen rotation by 360 degrees, giving the flames further variety. Also check the Randomize rotation direction checkbox.
Check the Random mirroring X and Y checkboxes. The particle bitmaps will now be randomly mirrored by both axes, to give further variety to the particles.
Flames tend to travel upwards. Change the flame’s Gravity multiplier to –2.5. It’s a good idea to use negative gravity instead of directed emission. This ensures that the flames always travel upwards regardless of the orientation of the emitter.
Change the Air Resistance (El. Velocity) to Cubic. This increases the flames’ air resistance when they gain velocity, preventing them from flying up way too fast.
Change Air Resistance (El. Size) to Linear. (With this particular effect though, the size-related air resistance has little effect).
Set the Air Resistance Constant to 4. Flames should have a reasonable amount of air resistance.
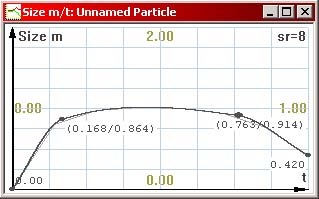
Since the graph is not very detailed, drop its sample rate to 8. The graph dictates that the particles will start from zero size, then grow up to size 1 (full size), and towards the end of their life cycle, shrink a little.
Click the Rotation Graph button, and edit the graph to look like this:

This makes the particles to rotate at a constant speed from –187 degrees to 0 degrees. The “Randomize Rotation Direction” checkbox randomly flips this graph for different particles for variety (the emitter’s Rotation Multiplier also affects the particles’ rotation, we’ll get into that later). Again, since the graph is only a straight line, you can reduce its sample rate to 2.
Next, click the Vertex Alpha Graph and edit it to look like this:

Because the flame bitmap sequences don’t have that many frames, this helps to smooth out the last frames where the flame dies out.Finally, click the RGB Color Graph button, and edit the graph to look like this:
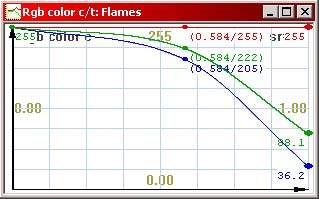
Just if you want to be fancy. This fades the flames’ color towards red as they die out.
All right! You’ve created a working flame particle! If you preview the effect now, it looks like a flame tower, and it still leaves a lot to be desired:
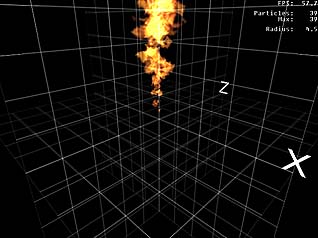
You see, particles alone don’t make the effect. The Emitter also needs to be tweaked carefully, because the Emitter has a lot of influence on how the particles behave.
Tweaking the emitter
The next thing to do is to start tweaking the Emitter you created. Select Particle Emitter from the Element and Emitter properties and double-click the “Unnamed Particle Emitter” to open its properties window.
The emitter needs a better name. Change it to something appropriate, like “Flaming”.
Since the flames travel upwards on their own, emission direction is not needed at this time. Leave the Direction graph unedited (except maybe dropping its sample rate to 2).
Just for the hell of it, also leave the Emission Random Velocity graph as it is. As default, the flames get tiny random velocity variation, but not much. Reduce the graph’s sample rate to 2.
Now let’s move to the Emitter Shape section. The flames probably look best when emitted from a flat plane. Change the Geometry under Emitter Shape to Square.
Set the minimum and maximum values for X to –0.15 and 0.15 meters. Leave the Y min and max values to 0. Set the minimum and maximum values for Z to –0.15 and 0.15 meters. This creates a flat square 30 by 30 centimeter plane inside which all the particles are generated. The origo of the effect is in the center of the plane.
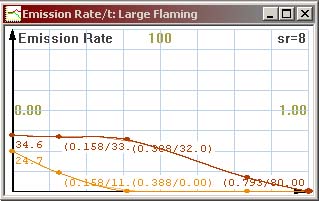
The flame effect we’re working on is constant, and meant to loop indefinitely. Set the Cycle length to 20 seconds, and edit the Emission Rate graph so that the upper graph is at roughly 80 and the lower graph roughly at 10. This is easiest to do by dragging the graphs up and down with the right mouse button. It doesn’t matter which line is higher and which lower. Since the graphs are used only for constant values this time (ie. horizontal lines), reduce their sample rate to 2. The particle effect will now run for 20 seconds after started, and emits 10 to 80 particles per time unit. Check the Cycle Looping checkbox. Particle effects can be either looped by checking this checkbox, or set to “looping” in the scripts (these details will be covered in other documentation).
Edit the Element Lifetime Graph so that the upper line is roughly at 1 and the lower line is roughly at 0.3. Again, drop the sample rate to 2. As a result, the emitted particles will have a lifetime between 0.3 and 1 seconds throughout the 20-second cycle.
Edit the Size Multiplier Graph so that the upper line is roughly at 0.9 and the lower line roughly at 0.4. The particles’ size will be randomized between 0.4 and 0.9 units throughout the cycle.
As with the above graphs, edit the Rotation Multiplier Graph to 0.2 and 0.6. This way, some flames will rotate less, some more. A rotation multiplier of 1 has no effect on the particle’s rotation graph; values larger than 1 increase the rotation, and positive values smaller than 1 reduce it.
Try previewing the flames. Looks much better now, doesn’t it?

The example file provided is actually a combination of two flame effects. The original emitter was cloned with the Clone button and edited a little. The first emitter spews smaller flames with a bit shorter lifetime, and the other one spews larger flames with a longer lifetime. This was done to prevent the smallest flames from flying too high up, which happens if you try to emit all flames from one emitter with a lot of size variation. This can result in very long-living, small flames if you’re not careful.
You may have noticed that the example fire effect that came with ParticleFX also contains a pillar of rising smoke. As an exercise, try to re-create the smoke from scratch. Here’s some pointers:
- The smoke bitmap provided with the example files is very bright in itself. Use the Color Graph to darken it.
- Smoke fades out smoothly. Ramp down the Vertex Alpha Graph. Since the smoke bitmap is quite opaque, you can start the opacity graph at an already low value and go down from there.
- Smoke rises upwards, but slower than flames. Use a smaller negative gravity multiplier.
- Smoke clouds tend to live a lot longer than flames. Random Element Lifetime from 2 to 5 seconds should be fine. Because of their long lifetime, they should be emitted at a lower rate to prevent excessively dense smoking.
Another interesting exercise could be to change the fire effect into a fireball-style explosion. Change the flame cycle’s length to 10 seconds, then give the Emission Rate, Size and Lifetime graphs more resolution, and make the effect first emit a lot of very large, long-living flames, then ramp the values down. As a result, the fire should start with a blast, then burn away until the flames go out. Here’s how to change the graphs: