Advanced Lighting
The Basic Lighting tutorial covered the lightmap rendering of level geometry, but there's a lot more related to lighting in Max Payne that you should be aware of. This article will explain how you can modify the lightmaps and radiosity settings, how to make the lightmap rendering process faster, and how the dynamic lighting works in Max Payne.
Lightmaps
Let us start with a little recap: As you probably have already gathered, the lightmaps are another texturing layer which is blended multiplicatively with the actual texturing. The lightmaps are usually much lower in resolution than the actual texturing and the color and luminance of lightmaps is calculated with radiosity rendering.
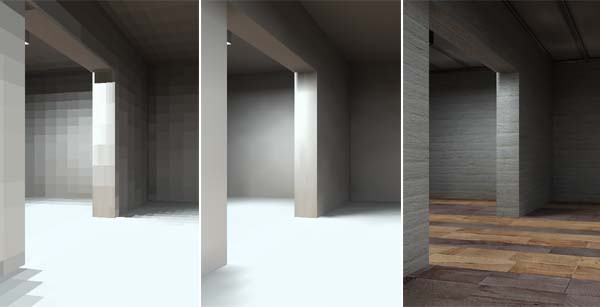
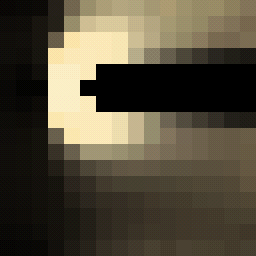
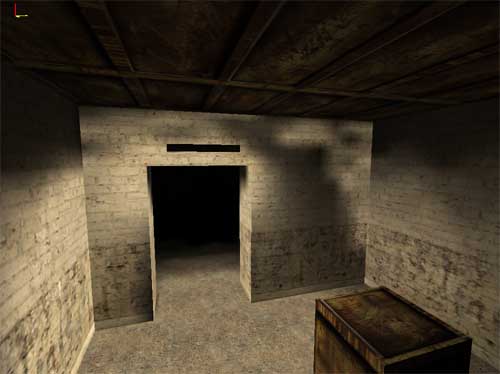
Here, below left, you see rendered lightmaps. For demonstrative purposes this picture is shown with bi-linear filtering off. Usually the lightmaps are smoothed with bi-linear and the you see them as seen in the below middle picture. When combined with higher resolution main texturing you get the realistic Max Payne lighting (below right).
The definite key element with lightmaps is their resolution. The higher their resolution, the better and sharper the looks, but also the longer the rendering times.
The resolution of a lightmap is given as texels per meter (textured element). For example, you have a square polygon which is 4 meters by 2 meters in size, the lightmap resolution of 4 will generate a lightmap on the surface which is 16 by 8 pixels. If you raise the resolution to, say, 5 texels per meter, you might still have a lightmap of 8x16 texels. Because of compatibility reasons, the lightmaps are not scaled linearly. The lightmap texel size only changes in powers of two giving the lightmaps dimensions like 2, 4, 8, 16, 32, 64 and 128 (which is the maximum size). In this example, the next jump in lightmap resolution comes when you raise the resolution to 8, and this makes the lightmap on the polygon to be 32x16 texels. This doubles the resolution, but quadruples the amount of texels, thus making that polygon render four times longer than the one with the resolution f 4.
You should first aim yourself to get an idea of what kind of results you will get with different resolutions, and learn right from the start to use lightmaps smartly, using absolutely as low-res lightmaps all around as possible and increasing the resolutions only in those places where you need the accuracy of light and shadow. For comparison, most of the lightmaps in Max Payne were rendered with resolutions of 4-6 texels per meter.
You can change the lightmap resolution of a single polygon by activating it (pointing at it) in F6-mode and pressing K. If you want to change the lightmap resolutions for a whole object or multiple objects, go to F5-mode, select them (CTRL-A for “All”), switch to F6 mode while the objects are selected, and press SHIFT-K.
The default lightmap resolution for new objects can be found in the preferences under "Texture mapping" as "Lightmap res txl/m" which will be used as resolution when new geometry is created.
You can also set the lightmap resolution of polygons based on their orientation. This is done in F6-mode by pressing the mouse middle button (CTRL-SPACE for 2-button mouse users) and selecting "Set lmres by normal". This method too can be applied just to the objects you have selected (again, select them first in F5-mode), or to the whole level by not selecting anything. The dialog asks first the resolution for floors, then walls, then ceilings (The resolution is interpolated for polygons not facing directly upwards, sideways or downwards). This function is very useful because generally higher resolution is only needed on the ground/floor and less while moving towards the ceiling. For Max Payne we generally used values like 4/3/2 or 3/2/1, but if you don't have multiple PC's to use as a rendering farm, you definitely want to use as low lightmap resolutions as you dare. Maybe 3/2/1 for final renderings, and selectively higher resolutions for there where specifically needed. In addition to the lightmap resolutions, there are other methods for speeding up the rendering than just setting lightmap resolutions. Read Selective Rendering and Radiosity Settings chapters in this article.
Large surfaces can easily produce maximum sized (128x128) lightmaps with high resolution, and these will take very long to render. So, watch out for these unless you have a rendering farm at your disposal. A method is provided for you to check that your lightmaps are of reasonable size, but it is based on coloring the lightmaps to illustrate their sizes, so unless you want to re-render everything, you should use a temp-copy of your map for this. Again, you can do this to the whole map or just a selection. In F6-mode, press the middle mouse button and select "colorize lightmaps".
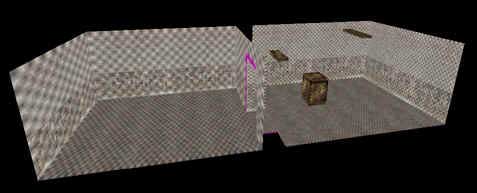
Here we have a picture of our level, with its lightmap resolutions set by the polygons' normals. The room on the right has 20/15/10 and the one on the left 8/4/2.
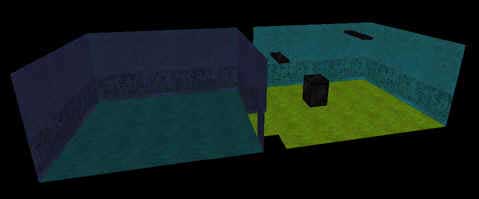
Here we have the level after colorizing the lightmaps.
MaxED colorizes small, compact lightmaps with darkish blue and huge, over-sized ones with red. Shades of cyan, green and yellow are in between.
Selective rendering
For furthermore speeding up the rendering process, you can process the lightmaps to your levels by rendering small portions of it at a time. Or even one object or one polygon at a time if that is desired. Selective rendering is especially useful for previewing lights, but you can also do final renderings like this if you pay some attention to what you are doing, and fix lightmap problems by hand if some occur.
To render just few objects from the scene, you select the objects in F5-mode, and press R. To render a single polygon, you point at a polygon in F6-mode and press R.
So it renders the lightmaps only for the selected objects, but does it take the surrounding objects and light emitters into account when rendering those lightmaps? For example the lights coming out from the neighbouring room? Well, you can decide this by the "hide other objects" tick in the preferences. With this, you can make MaxED to not take any other objects but the selected ones into account for the lighting solution. Note that any hidden objects aren't included into radiosity rendering in any case. Needless to say, rendering single polygons while "hide other objects" is enabled results into pitch black lightmaps.
General radiosity settings
There are few radiosity-related settings in the MaxED preferences that you should be aware of and that greatly affect the radiosity rendering quality and speed.
The important settings regarding radiosity rendering are:
- Radiosity viewport size. You can think of this as how accurate the eyesight of the rendering process is. Every texel is rendered so that a "camera" is set on it, and that camera "looks" into all directions (these are the tiled pictures that flash in the rendering process window) and based on what it "sees", it sets the color and brightness of the texel. If you have a very small viewport size, the pictures that the imaginary camera takes are very small and only the biggest light sources and surfaces can be made out of them, i.e. a small light relatively close to an object might not cast light to it because the camera lighting the objects surface doesn't "see" the small light. This value affects only the first pass and possible other passes are always rendered with minimum sized 32x32. The levels in the game have been rendered with values between circa 80-150.
- Radiosity passes. In effect, the amount of times the light bounces. With just one pass, the light is calculated simply from the source to object surfaces. With two passes, a bounce from those surfaces is further calculated, etc. The levels in the game have been rendered with 3 passes.
- Radiosity boost and Intensity (not visible in the window, set per light source). These two define the brightness of your lights. Radiosity boost is the brightness that all light sources inherit, and intensity (default 1.0 = 100%, i.e. full intensity) can be dropped to tone down individual sources without affecting others. To understand the purpose, consider this style: keep the radiosity boost high (maybe as high as 250) so that you are able to cast concrete amounts of light even with very small light sources, and when doing big light sources, drop their intensity to avoid having them light up half the level. The levels in the game have been rendered with values around 200.
- Radiosity backplane. The distance in meters the light remains strong enough to affect. The levels in the game have been rendered with maximum value.
- Average lightmap borders. Check this for a moderate speed boost on rendering. The lightmap borders are then averaged instead of proper calculation. More speed at the price of quality. If your geometry is orthogonal you can put this on with practically no quality loss. Any triangular polygons may produce darkish spots.
- Global lightmap res. Drop this slider to quickly set all lightmaps down in resolution for the time of one render (after which the slider is reset). Again, more speed, less quality.
Copy/pasting lightmaps
This feature can be very useful sometimes. To elaborate, we'll have a go at the wall of our level with the door and the light above it. In F6-mode, point at the wall to activate it and press CTRL-C.
Now you have the lightmap in the clipboard and you can paste it to any image-editing software (yes, or to another polygon). Below on the left you see a magnification of this lightmap. It's tilted and flipped. That happens and sometimes, in order to paste a lightmap on a polygon, you have to first flip it around in an image-editing software and re-orient it so that it comes out right. Since I'm about to just edit this a little and then paste it back on the same polygon, We won't touch it's orientation.

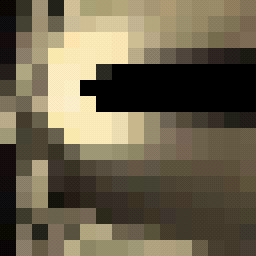
On the right is the same lightmap after a bit of smudging. Again, it has to be copied from the software, and in F6-mode pasted back to the polygon. Here's the result:
Keep in mind that if you do this and re-render, regardless of what sized lightmaps you have pasted where, all polys will be reset to their own resolution and then rendered, so copy-pasting lightmaps is quite risk-free, and even recommendable as a way to quickly fix small stuff without having to render. This obviously also gives you a lot of freedom to achieve effects that would be very difficult or even impossible to produce by means of rendering.
Another method for manipulating lightmaps is to add extra light layer into the lightmaps. More info about this in the Advanced Texturing article.
Dynamic lighting
In addition to the lightmaps, which are of course always static, there's also a need for dynamic lighting. For example for lighting the characters, the decals and dynamic objects, or for the lights emitted by explosions and fires.
The characters are lit by setting up pointlights or spotlights. The difference between them is that pointlights emit light to all the directions, and spotlights have a lightcone defined. Neither of them affects static geometry.
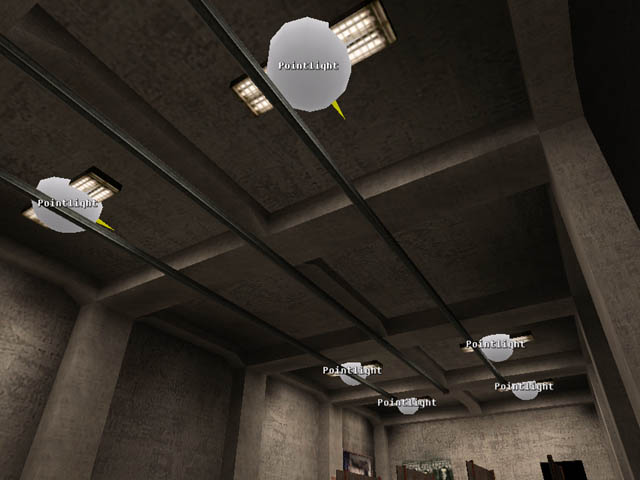
To set up a pointlight, you just create a pointlight entity in F3 mode (Press N and select "pointlight" from the dialog). You can change the pointlight properties by selecting it and pressing enter. You are going to need to experiment with the settings for a while to get them right. As a rule of thumb, you should have a pointlight (or spotlight) for every light source in the level. Note that pointlights, like all the dynamic lights, don't get blocked by level geometry, except the room boundaries (except when the light falloff reaches an exit, then the pointlight in question will light characters in the other room as well).
As a general tip, if your lightsources are very high above the floor, it's usually a good idea to place the pointlights few meters below the lightsources so that you won't need to make them insanely large.
To create a spotlight, just select an object that has light emitting surfaces, press enter to get to the properties, and set the "Export lights" flag on. You can see the spotlights' cones and falloffs visualized by selecting View > Visualize lights. You can alter the spotlight properties by pointing at the light-emitting polygon in F6 mode, pressing middle mouse button and selecting "Spotlight properties". A serious word of warning though; spotlights are far more expensive framerate-wise, and it is suggested not to use them unless it is absolutely required. Just as an example, there is no single spotlight in use in Max Payne.
NOTE: There's a setting in levels.txt called "AmbientColor", this is an RBG value defining the level of ambient character lighting. It is the first setting you should select for your level before starting to set up dynamic lights. Naturally it should be roughly as low as the most low-lit parts of your level.
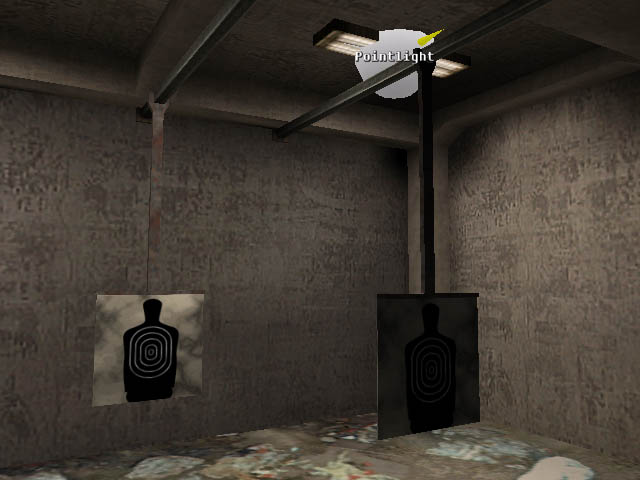
As mentioned before, pointlights and spotlights also affect dynamic objects if so desired. Normally, if the DO doesn't have lightmaps, pointlights will affect the DOs dynamically. Below is a picture of two shooting-range cardboard figures. They are DOs, and positioned differently in the relation to the pointlight, so you can see how the pointlight illuminates the cardboard behind it, but not the one in front of it. If you animate the cardboards, you can see it moving in and out of the light correctly.
In the object properties for DOs there's a flag called "Lightmapped", and if you set it on, lightmaps will be created on the dynamic object when you do radiosity rendering. When the DO has lightmaps, it will not get affected by pointlights, unless you also set the "Pointlights affect" flag on. But if you do that, you need to modify the lightmaps of the object to be a lot brighter than they otherwise should be in order to make it look good. Most DOs in Max Payne were using lightmaps but were not getting affected by pointlights.
You can also make the dynamically lit objects to appear more round and smooth by using gourad shading on the desired polygons. This is applied the same way you turn on lightmap smoothing; by adding a polygroup and turning on "Smooth lightmaps" for them. If you turn it on while the polygons don't use lightmaps, it will cause them to gourad shading instead.
Note however that you have to switch in and out of the rendering mode (F2) in order for MaxED to visibly switch from flat shading to gourad shading and vice versa. More about polygroups in the Advanced Texturing article.

Particle lights
Then there's still particle lights. In short, these are dynamic lights that affect all the characters and DO's, but also the static geometry. Most obvious example light emitted from explosions. All the effects in "particles.txt" that are prefixed with "Light_" are effects that include only a dynamic light effect. For more info about how to make your own particle lights, refer to ParticleFX tutorial.